

Categorizing expenses isn’t thrilling, but it’s essential for tracking your business’s financial health. In Xero, expense categorization happens through a process they call "reconciliation", which differs from traditional bank reconciliation. While the terminology can be confusing, this guide focuses specifically on how to accurately classify transactions into the right buckets (like office supplies, travel, or marketing).
You might wonder: If Xero automates this, why do I need to review it? While Xero learns from your habits, it’s not perfect. Regular categorization ensures:
- Accurate tax deductions (no missed write-offs!)
- Clean books for your CPA (saving you time and fees)
- Real-time insights into spending trends
Aim to categorize expenses weekly or monthly. It’s easier than a year-end scramble!
Step 1: Start the Process
- Log in to Xero and go to your dashboard
- Click “Reconcile Items” under the relevant bank account
Despite the name, you’re categorizing expenses here. Xero groups this under “reconciliation” because it’s a part of closing your books. 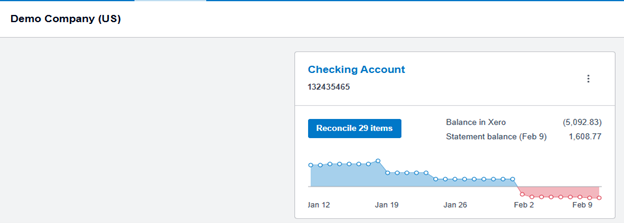
Step 2: Review Xero’s Suggestions
Xero auto-matches transactions to existing invoices/bills (highlighted in green). Always review suggestions carefully. Incorrect categorization can lead to inaccurate financial reports and missed tax deductions.
If correct: Click “OK” to accept.
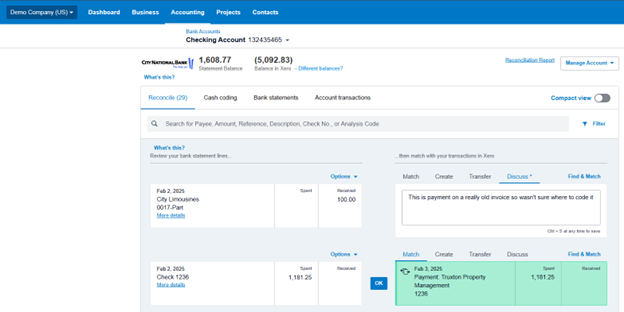
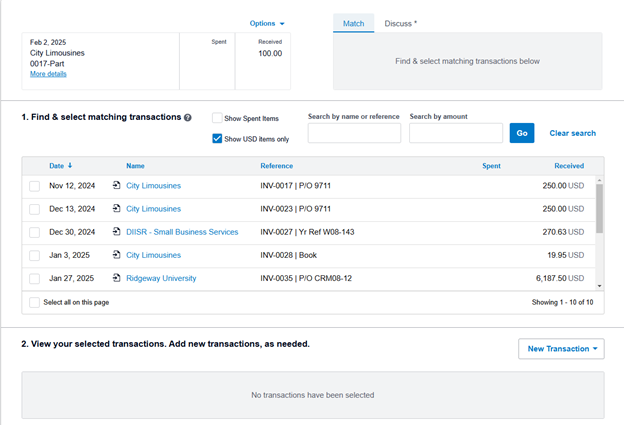
If wrong: Click “Find & Match” to search for the right category.
You can click on a transaction to view Xero’s reasoning (e.g., “Matched to Invoice #123”).
Step 3: Create Rules
Create Bank Rules (For Repeat Transactions)
Bank rules are your secret weapon for automating expense categorization. Think of them as teaching Xero to recognize patterns in your transactions, so you don’t have to categorize the same coffee order every week manually.
To set them up:
- In the reconciliation screen, find a transaction you want to automate (e.g., your monthly internet bill)
- Click “Options” above the transaction
- Click "Create Rule"
- Choose the rule type:
- Spend Money Rule: For outgoing payments (e.g., categorizing all "FedEx" transactions as Shipping Expenses)
- Receive Money Rule: For incoming payments (e.g., tagging all transfers from "PayPal" as Client Payments)
- Transfer Money Rule: For moves between your accounts (e.g., categorizing transfers to savings as Asset Transfers)
- Use wildcards (like "Amazon") to catch similar payees. Review rules quarterly; your business expenses evolve over time!
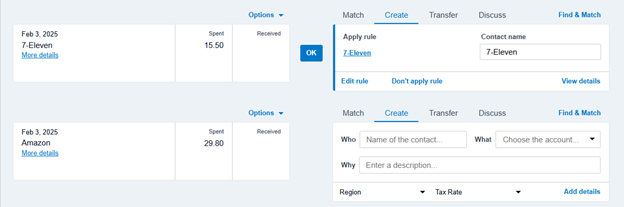
Create Individual Transactions (For One-Off Expenses)
For transactions that don’t fit a rule (e.g., a rare vendor or unique expense), categorize them manually:
- Click the transaction and select "Create"
- Fill in the details:
- Who: The vendor/payee (e.g., "Miami Conference Center")
- What: The correct expense account (e.g., Travel > Conferences)
- Why: A note for context (e.g., "Industry conference ticket")
Use manual entries to track unusual or one-time transactions. If your software doesn’t auto-tag a transaction, like a client gift or a refund, enter it manually and add a short note about the business purpose. That way, your CPA can correctly identify deductible expenses later.
If you’re not sure how to categorize something, don’t just guess. Use a placeholder like “Ask My Accountant” or “Uncategorized” instead of misclassifying it as a business expense. This keeps your books clean and gives your CPA a chance to review it properly during reconciliation.
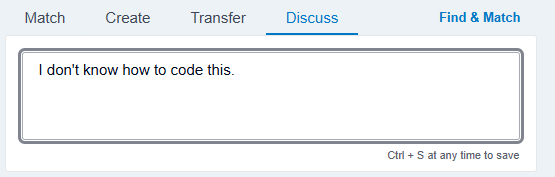
Flag for Later: Use the “Discuss” tab to mark unclear transactions for your accountant.

Step 4: Verify and Lock It In
Before finalizing your reconciliation, make sure everything has been categorized and nothing important has been missed.
Start by checking for uncategorized or unreconciled transactions:
- Go to the Bank Statements tab under the bank account
- Click Search, then filter Status → Unreconciled to see if any transactions were skipped
- You can also filter by Unreconciled on the Reconciliation screen to catch anything missed there
Next, review any high-dollar transactions and confirm they’re categorized correctly. These are often audit targets.
Once all categorization is complete, you’ll move to the Reconcile Period tab to finalize the process:
- Navigate to Reconcile Period in the bank account view
- Click the green Create Period button (top right)
- Enter the date range from your bank or credit card statement. For bank accounts, it’s typically the first to the last day of the month. For credit cards, use the custom range from your statement.
- Input the opening and closing balances from your statement
- Click Start Reconciling Period
This view shows all transactions for that period, making it easier to verify accuracy and catch duplicates or missing entries. Duplicates will typically appear unreconciled under the Bank Statements tab. You can safely remove those.
Once everything matches and all transactions are accounted for, click Reconcile to lock it in.
Why This Matters
Consistent categorizing gives you control over your finances by helping you:
- Spot overspending (e.g., noticing your “Coffee Runs” category is rivaling your marketing budget)
- Prepare for taxes (no more guessing which expenses are deductible)
- Simplify audits (organized records = less stress)
The Bottom Line
Getting your expense categories right in Xero might seem like a small task, but it makes a world of difference when tax season rolls around. While Xero's tools do most of the heavy lifting, your oversight ensures everything lands in the right place. Once you set up solid bank rules and get into the habit, it becomes second nature.
Need a hand with your expense categories? Whether you're setting up Xero for the first time or cleaning up past transactions, our team can help you create a categorization system that saves time and maximizes deductions. Schedule a call with a DiMercurio Advisors team member today to get started.